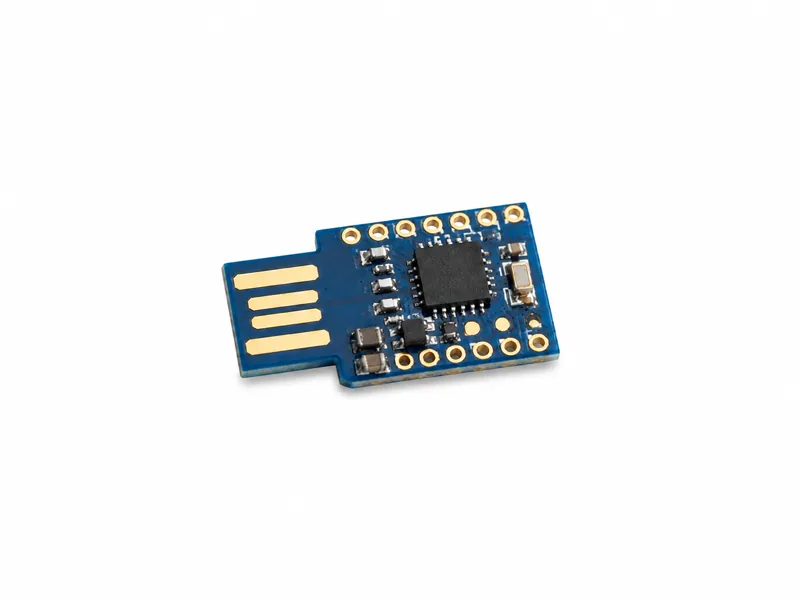
Digispark USB Development Board
The tiny ATtiny85 board I used to build and program a DIY USB keystroke-injection demonstrator in the Arduino IDE.
This is the inexpensive board that turned a security idea into something I could hold, program and test. I used a Digispark ATtiny85 and the Arduino IDE to write controlled remote-access demonstration payloads for my own isolated equipment. The result behaves like a tiny DIY USB Rubber Ducky: simple enough to understand from end to end, yet convincing enough to expose how much trust a computer gives a newly connected keyboard.
Start with the device, then talk through the learning goal, authorised setup and support that make it useful.
Highlights
- Low-cost ATtiny85 board with direct USB connection
- Programmable in the familiar Arduino IDE
- Built from first principles rather than a sealed commercial tool
- Ideal for small, transparent and repeatable lab demonstrations
Why I built this one myself
Commercial USB testing devices make a polished demonstration, but the Digispark makes the mechanism visible. It is a small ATtiny85-based development board that plugs directly into USB and can be programmed from the Arduino IDE. I used it to create controlled remote-access demonstrations against my own disposable lab system. Building the sketch, compiling it, handling timing and watching the host interpret the board as a keyboard made the trust failure much clearer than simply running somebody else’s payload. The point was never covert access. It was to understand exactly what the computer believes when a new input device appears.
How a development board becomes a keyboard
Most people think of USB risk as an infected flash drive. This board demonstrates a different path. With suitable firmware, the Digispark can present itself as a human-interface device, the same broad category used by a normal keyboard. The host therefore receives keystrokes rather than opening a folder of files. Those keystrokes can move through menus and type prepared commands at a speed no person could match. Nothing supernatural is happening and the board does not automatically gain administrator rights; it is using the permissions and screen state already available. That distinction is precisely why the demonstration is useful.
What the demonstration reveals
A storage-only USB policy does not address a device that identifies as a keyboard. A contained Digispark exercise lets a team ask better questions: Are unknown input devices allowed immediately? Does the user work with more privilege than the role requires? Would application control stop an unexpected interpreter or script host? Would endpoint monitoring show the rapid process chain? Would the person at the desk challenge an unfamiliar device or assume it belongs there? One tiny board connects physical security, endpoint configuration, identity and staff behaviour in a way that a slide deck rarely can.
Why the limitations are a strength
The ATtiny85 is constrained by design. Available program space is small, the keyboard layout must match the target, and reliable execution depends on boot time, focus and application state. A locked screen, an unexpected prompt or a slower machine can break a sequence. These are not defects to hide; they stop the device being presented as magic and make cause and effect easy to examine. Compared with a more advanced platform, the Digispark is easier to reset, easier to explain and less likely to obscure the lesson behind layers of automation.
Who this board is for
This is the best fit for a maker, student, trainer or small security team that wants to understand USB keyboard emulation rather than merely purchase an appliance. It suits short awareness demonstrations, entry-level device-control testing and supervised workshops where every line of the sketch can be reviewed before use. It is not the right choice for someone expecting the reliability, payload management or cross-platform features of a purpose-built Rubber Ducky or Bash Bunny. Its value is affordability, transparency and the satisfaction of learning how the mechanism works.
A safe lab workflow
Use a spare or virtualized target with no personal accounts, saved passwords or business data. Review the sketch before compiling it, define the expected screen and keyboard layout, and keep a recovery method available. The exercise should have one written objective, such as confirming that an unknown keyboard is detected or that a restricted account cannot launch an unapproved tool. Record the result, remove the board, restore the target and keep the device labelled as active test equipment. Never leave a programmed board where it could be mistaken for an ordinary adapter.